Node Application Setup
Developers often make certain mistakes when beginning a project, such as failing to implement linting, not using compile-time type checking, having inconsistent code styling, etc. This chapter aims to provide solutions for these issues and share some of the best practices that we follow in our team at DECODE.
Node.js
Initially, you should install Node.js, a Javascript runtime environment, on your local computer. It's recommended to use nvm (node version manager) for the installation process as it allows you to switch between different versions of Node.js effortlessly. Upon installing Node.js, npm (Node package manager) is automatically included.
wget -qO- https://raw.githubusercontent.com/nvm-sh/nvm/v0.39.3/install.sh | bash
To begin your project, you will need to create a directory for your project:
mkdir nodejs-onboarding && cd nodejs-onboarding
Next, you can create a package.json file by using the npm init command. In this phase, you can add various details about your application, and if you're unsure about what to include, you can always modify it later. This file serves as the primary reference point for your app if you intend to transfer and run it on other machines or the cloud. Moreover, it enables you to specify various scripts, configure other tools, and most importantly, identify all the dependencies necessary for running the application.
Typescript
With your project directory set up, you can install TypeScript:
npm install --save-dev typescript
The --save-dev flag must be included as it designates TypeScript as a development dependency, ensuring that it is essential for the project's development.
The next step is to configure the typescript configuration in your tsconfig.json file. This configuration depends on the project or your preferences. It is best to stick to a predefined configuration decided by the company if it is not necessary to do it differently.
{
  "compilerOptions": {
    "target": "exnext",
    "module": "commonjs",
    "outDir": "dist",
    "sourceMap": true
  },
  "include": ["src/**/*.ts"],
  "exclude": ["node_modules"]
}
Prettier
To have consistent code styling install and use prettier
npm install --save-dev prettier
Prettier is a tool that can detect style issues in your files and automatically reformat your code to ensure consistency in indentation, spacing, semicolons, single quotes vs double quotes, and other aspects. Some developers prefer to configure their IDE to automatically format code when saving or to run a script that formats code prior to pushing it or creating a pull request.
{
  "singleQuote": true,
  "printWidth": 100,
  "proseWrap": "always",
  "tabWidth": 4,
  "useTabs": false,
  "trailingComma": "none",
  "bracketSpacing": true,
  "bracketSameLine": false,
  "semi": true
}
{
  ...
  "scripts": {
    ...
    "prettier": "prettier --check src/**/*.ts",
    "prettier:fix": "prettier --write src/**/*.ts",
    ...
  }
  ...
}
To ignore specific files and directories create an .prettierignore.
node_modules
dist
ESLint
To detect and report potential problems in JavaScript code you should install and use eslint:
npm install --save-dev eslint @typescript-eslint/parser @typescript-eslint/eslint-plugin
{
  "root": true,
  "parser": "@typescript-eslint/parser",
  "plugins": ["@typescript-eslint"],
  "extends": [
    "eslint:recommended",
    "plugin:@typescript-eslint/eslint-recommended",
    "plugin:@typescript-eslint/recommended"
  ]
}
{
  ...
  "scripts": {
    ...
      "lint": "eslint src/**",
      "lint:fix": "eslint src/** --fix",
    ...
  }
  ...
}
To ignore specific files and directories from linting create .eslintignore.
node_modules
dist
Husky
Husky is an package that provides a simple way to set up Git hooks in a Node.js project. Git hooks are scripts that Git executes automatically at certain points during the version control process, such as before a commit or after a merge. Husky is often used to enforce code quality and consistency by running linters, tests, and other checks before allowing a commit to be made. It can also be used to automate tasks like building a project or deploying code to a server.
npm install --save-dev husky
{
  "scripts": {
    ...
    "prepare": "husky install"
    ...
  },
  "lint-staged": {
    "*.{js,ts}": "npm run lint:fix",
    "*.{js,css,md,ts,html}": "npm run prettier:fix"
  }
}
Environment variables
The industry standard for handling environment variables uses .env files and dotenv modules. You can handle different environments by following it's documentation and customizing .env files.
Architecture
Instead of Package by Layer, which is monolithic architecture, Package by Feature and Domain-driven design as a modular approach should be followed in projects.
All items related to a single feature should be placed into a single directory/package. The result is packages that are minimally coupled together but have high cohesion and modularity. In an ideal scenario, the package will not be used by any other feature in the application, and that way, it may be removed by simply deleting the directory. But the package-by-feature idea doesn't imply that one package can never use items from other packages.
If you are new to this approach, please read Package by Feature and Package by Layer vs Package by Feature.
Furthermore, every feature should have so-called layered architecture inside itself if needed. That way, roles and responsibilities within the feature are separated into layers.
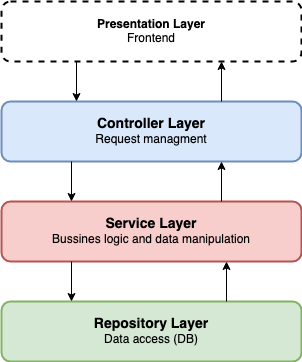
The data journey starts with an API request, usually called at the presentation layer (e.g., the user clicks a button that triggers a request to the API route). The controller assigned to that route will get a request, pass it to the service layer and wait for a response. See controllers like a manager for requests. Based on the request service layer will call a repository layer to get the required data from the database, perform business logic, manipulate data and return it to the controller. The repository layer contains code that works with the database, and it's the place where SQL queries or ORM operations are placed.
src/
  |-- user/
    |-- dtos/
        |--- user.dto.ts
        |--- create.dto.ts
        |--- edit.dto.ts
    |-- entities/
        |--- user.entity.ts
    |-- tests/
        |--- user.test.ts
    |-- user.controller.ts
    |-- user.service.ts
    |-- user.repository.ts
    |-- user.mapper.ts
    |-- user.seeder.ts
    |-- user.factory.ts
Running the application
To run application you need to compile typescript files first using typescript compiler tsc and serve it with node ./dist/index.js.
Another way is to use ts-node ./src/index.ts which allows you to directly execute typescript on nodejs without precompiling.
npm install --save-dev ts-node
To avoid recompiling every time you change something in your code install and use nodemon.
npm install --save-dev nodemon
In package.json add nodemon config:
...
"nodemonConfig": {
    "watch": [ "src" ],
    "ext": "ts",
    "exec": "ts-node src/index.ts"
}
...
Now you can start application in watch mode with just running nodemon in your terminal.
All these terminal commands can be predefined as scripts in package.json.
...
"scripts": {
    ...
    "dev": "ts-node src/index.ts",
    "watch": "nodemon --legacy-watch",
    "build": "tsc",
    "start": "node dist/index.js"
    ...
},
...
npm run dev
npm run watch
npm run build
npm run start